Chrome Remote Desktop on Ubuntu Black Screen

I recently had an issue with encountering a black screen and a black “X” cursor with Chrome Remote Desktop on Ubuntu 20.1

A few searches led me to a stack overflow entry from 2014. However, I’m lazy so I figured I’d start simple.

Using the commands below to stop and start the service fixed my issue.

user@server:$ /opt/google/chrome-remote-desktop/chrome-remote-desktop --stop

user@server:$ /opt/google/chrome-remote-desktop/chrome-remote-desktop --start

I have since encountered this issue a few times. Having a smaller browser window also seems to help avoid the issue.

Posted in Uncategorized | Tagged , , , | Leave a comment

Add Git Bash to Windows Terminal (Preview)

To add Git Bash as a tab to your Windows Terminal, use the “V” icon and select “Settings” or press “Ctrl + ,”

This will open up the profiles.json file in your defined editor.

Add an entry to “profiles:”

,
{
"acrylicOpacity" : 0.75,
"closeOnExit" : true,
"colorScheme" : "Campbell",
"commandline" : "C:\\Program Files\\Git\\bin\\bash.exe --cd-to-home",
"cursorColor" : "#FFFFFF",
"cursorShape" : "bar",
"fontFace" : "Consolas",
"fontSize" : 10,
"historySize" : 9001,
"name" : "Git Bash",
"padding" : "0, 0, 0, 0",
"snapOnInput" : true,
"startingDirectory" : "%USERPROFILE%",
"useAcrylic" : false
}

“GUID”: will be generated for you.

The important line is

"commandline" : "C:\\Program Files\\Git\\bin\\bash.exe --cd-to-home",

This line points to the install location of the bash executable.


Add git bash as a tab in windows terminal

Add git bash as a tab in windows terminal

Posted in Uncategorized | Leave a comment

Sass in Sublime Text – A lesson in RTFM

sass error sublime text

'sass' is not recognized as an internal or external command,
operable program or batch file.
[Finished in 0.4s with exit code 1]

I received this error when attempting to build / compile SASS into css. If you’ve been trying to utilize features and plugins of Sublime Text to speed up your workflow like me, you’ll have probably hit a few inconsistencies. Today’s hiccup was an issue with the SASS Build plugin.

A quick Google search yielded a few possible explanations for this error, but failed to solve my particular problem. In this case I learned that using the Package Manager installs plugins but it will not install all of the underlying resources used to run them. In this case Ruby nor the SASS compiler were installed.

When Google search fails, consult the documentation! Here’s an excerpt from the readme.md file:

Prerequisites
————-

Requires **Ruby** & **SASS** libraries.

Step by step:

1. Install Ruby library

**Windows**: Download and install Ruby. You can find it here:
http://rubyinstaller.org/downloads/

Reboot after install it.

**IMPORTANT**: Don’t forget to mark the option ‘*Add Ruby executables to your PATH*’.
If you don’t check the option, you will have to modify the path in the Build file afterwards.

**OS X & Linux**: It’s already installed. Easy! 🙂

2. Installing SASS

Open your console (‘*Command promp with Ruby*’ on Windows) and execute the following command:

`gem install sass`
If you’ve properly installed Ruby, “Command prompt with Ruby” can be found under Start Menu > Ruby … > Command prompt with Ruby
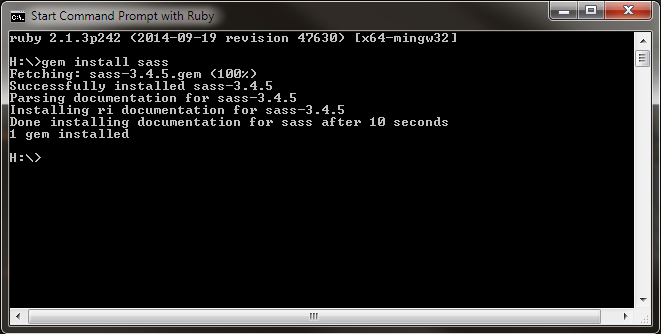
command prompt with ruby

Installing
———-

**OPTION 1 – With the Package Control plugin (recommended)**

The easiest way to install this package is through Package Control.

1. Download and install the [Package Control Plugin](http://wbond.net/sublime_packages/package_control).
Follow the instructions on the website.

2. Open the command panel: `Control+Shift+P` (Linux/Windows) or `Command+Shift+P` (OS X) and select ‘**Package Control: Install Package**’.
3. When the packages list appears type ‘**SASS**’ and you’ll find the **SASS Build System**. Select to install it.

4. Now you can compile your SASS files! Launch your build with `Control+B` (Linux/Windows) or `Command+B` (OS X).

5. Enjoy your coding =)

Posted in Uncategorized | Leave a comment

jQuery Bread Crumb Trail Plugin

This plugin will take the URI segment of the URL and split it into links based on directory names. This is not the most attractive method of doing this, but is very useful when trying to add breadcrumbs to older websites that have a good document hierarchy.

/*
  Generate breadcrumbs based on URI
*/
(function( $ ){
  $.fn.breadCrumb = function( options ) {
      //---------------------------------------------------------------
      // jQuery breadCrumb v0.1
      //---------------------------------------------------------------
      var $obj = this;
      var settings = {
          'home'        : "Home",
          'seperator'    : ">",
          'title'        : document.title
      };
      var settings = $.extend(settings, options);
      var $trail = "";
      var $path = document.location.pathname.replace(/%20/gi, " ");
      var $originalContents = $obj.html();
      var $title = settings.title;
      
    //each implementation
    this.each(function(){
        $directories = $path.split("/");
        $directories[0] = settings.home;
        pathRebuild = "/";
        
        //first breadcrumb is link to home
        $trail += '<a href="/">' + settings.home + '</a> ' + settings.seperator + " ";
        
        //loop through subsequent directories skipping the top level document
        for ( i = 1; i < $directories.length - 1; i++ ){
            pathRebuild += $directories[i] + '/';
            $trail += '<a href="' + pathRebuild + '">' + $directories[i] + '</a> ' + settings.seperator + " ";    
        }
        
        //$obj.html($trail + $originalContents);    //alternative
        $obj.html($trail + $title);    //use document title
    });
  }
})( jQuery );

Usage

Under your jQuery $(document).ready statement, use the following to initialize the breadcrumb trail into the DOM Object of your choosing. In this case we are using an element with id=”jquery-breadcrumb”

$("#jquery-breadcrumb").breadCrumb({'home':'Website Name'});

Live Demo

http://jsfiddle.net/BamA8/

Posted in Uncategorized | Leave a comment

Simple Animated Content Slider with jQuery

Content sliders are fairly simple things to implement, as they can be built with using only a few basic pieces of html, css, and javascript ( if you are focusing development on css3, javascript is not needed at all ).

These basic pieces can be broken down as such:

Html Content :

Design and code your content in blocks, set them to float:left; so they form a single line. Below I have created a div called #slideContent, this contains a bunch of divs with a set css width, and float:left properties. You really need to do nothing more than line your elements up single-file.

CSS Masking :

Since we have everything in a nice single line, we can then wrap the #slideContent div in another div, which we will call #slideMask. For #slideMask, we will need to set the css to a fixed width, and set the overflow:hidden; property. This will enable our “masking”, and hide any child-elements that extend beyond the bounds of this container. Below is a diagram outlining how the #slideContent div will extend beyond the bounds of #slideMask (without overflow:hidden;).

Javascript :

Javascript/jQuery has several important roles. First, it will set the width of #slideContent, which will need to be calculated if you do not explicitly set it in css. Second, it calculates how far to move the slider ( offset: x property ). Third, it handles ‘click’ events and triggers the sliding animation. Below images show how the #slideContent div shifts when setting the left:-x; property with and without overflow:hidden; enabled.

Demo & Code :

Posted in Uncategorized, Web Development | Tagged , , , , , | 1 Comment

Mental Ray – Light Scattering

While tweaking shaders, textures and bump maps for tree bark and ivy, I set to create a ‘depth’ to the textures; for light to enter, bounce around inside, giving a sense of depth to the surface. However, not entirely successul, I did create an interesting example as to the difference of ‘light scattering’ on and off with this Ivy texture.
3d ivy on a tree

Left: Maya Viewport. Center: Light Scatter Enabled, Right: Light Scatter Disabled.
Posted in Uncategorized | Tagged , , , | Leave a comment

(Android) PhoneGap Cordova 1.5 menubutton and searchbutton with jQuery Mobile

Using PhoneGap (Cordova) 1.5, I ran into an issue with the physical buttons on the Android device, specifically I was trying to bind handlers to “menubutton”, “searchbutton”, and use them to navigate within a jQuery Mobile app. However, these buttons only worked on the first/initial jQuery Mobile page. After this page was navigated from, the buttons no longer worked.

After attempting many different solutions and workarounds, I came across a very simple solution.

A few lines from the bottom of the cordova.js (1.5.0) file, you will find the line:

// boot up once native side is ready
channel.onNativeReady.subscribe(_self.boot);

Change it to:

// boot up once native side is ready
channel.onNativeReady.subscribeOnce(_self.boot);

I believe this has something to do with a conflict in the way jQuery Mobile binds to the document.

For good measure, here is the JavaScript I used in the <head> of my index.html

$(document).bind("mobileinit", function(){
    //first init
});

$(document).on("pageinit", function(){
    //each jqm page init
});

//From PhoneGap's documentation on creating listeners for buttons
function init(){
    document.addEventListener("deviceready", onDeviceReady, false);
}

//when phonegap is ready
function onDeviceReady() {
    //event listeners for buttons
    document.addEventListener("menubutton", menuButton, false);
    document.addEventListener("searchbutton", searchButton, false);
}

//when menu button is pressed
function menuButton() {
    //change to main menu page
    $.mobile.changePage("#menu", {transition: "slidedown"});
}

//when search button is pressed
function searchButton() {
    //change to search page
    $.mobile.changePage("#search", {transition: "slideup"});
}
Posted in Mobile Development | Tagged , , , , , , , | 3 Comments

(Android) DroidGap Cordova 1.5 – Error with “Getting Started”

Here is a simple fix to get the new version of DroidGap (1.5) working on Android.

The “Getting Started” section for android simply states an incorrect import. “import com.phonegap.*” If Ecplise is showing errors, change it to “import org.apache.cordova.*

If you’ve used “quick fix” in Eclipse, you’ve probably gotten “import org.apache.cordova.DroidGap;” , which is close, just replace .DroidGap with .* and you should be set.

package com.phonegap.myapp;

//import android.app.Activity; //remove
import android.os.Bundle;
//import com.phonegap.*; //this doesn't work
import org.apache.cordova.*; //this replaces above line

public class MyActivity extends DroidGap {
    /** Called when the activity is first created. */
    @Override
    public void onCreate(Bundle savedInstanceState) {
        super.onCreate(savedInstanceState);
        //setContentView(R.layout.main);
        super.loadUrl("file:///android_asset/www/index.html");
    }
}

Don’t forget to add /lib/cordova-1.5.0.jar to the build path.

Within your AndroidManifest.xml, do a quick find and replace for “com.phonegap” , changing it to “org.apache.cordova”

For me, this replaced two entries.

Posted in Mobile Development | Tagged , , , , , | 3 Comments

Affecting a series of (recursive) elements with css

Many sites use some form of rating system for content – here is an example of how to create series of elements for a ranking meter using only html and css.

HTML

<div id="stars">
  <div class="star">
    <div class="star">
      <div class="star">
        <div class="star">
          <div id="innermost" class="star">
          </div>
        </div>
      </div>
    </div>
  </div>
</div>

CSS

.star {
  display:block;
  width:20px;
  height:20px;
  margin:0px;
  padding-left:20px;
  background:#00f;
  border-left:1px solid #f00;
}
#innermost {padding-left:0px;}
#stars .star:hover{background:#ff0;}

Live Demo here http://jsfiddle.net/MpmMa/

Posted in Web Development | Tagged , , , | Leave a comment

CSS Double Border

Today I came across an interesting prospect – How to emulate a double border using only CSS.

This can be achieved with the :before and :after pseudo selectors.

xhtml

<div id="myDiv">Some Text Here</div>

CSS

#myDiv, #myDiv:after {
    display:block;
    background:#00f;
    width:100px;
}

#myDiv:after {
    content:" ";
    border-top:1px solid #FFF;
    border-bottom:3px solid #000;
}

Preview it here: http://jsfiddle.net/2BQ8f/

Posted in Web Development | Tagged , , | Leave a comment